

Walls: Part Two
I live in a century home. We often romanticize older homes - and for good reason. Everything we know about building today was much harder 20, 50 or even over 100 years ago. The wood was not milled as consistently. There were very few, if any power tools being used. The carpenters swung hammers rather than firing pneumatic nail guns. So when the house is old and the floors aren’t level and the walls aren’t flat it we cherish it. We honour and respect the efforts of the craftsman that came before us.
But when we go into the mass produced tract homes in new developments by some large builders and we see the same wavy walls, it feels shoddy. Now admittedly, the framing material in the typical house is still not perfect. But even with all of our advanced materials and tooling we have grown accustomed to sacrificing quality, good technique, and best practice on the altars of speed and production.
In this short blog I will cover some very simple and practical tips any DIY’er can put into practice to improve the quality of their work with little, to no extra effort and these are steps that should be non-negotiable for any boutique builder.

2.1
1) Layout
As mentioned in Walls: Part One walls should be “snapped” on the floor first. A bright and crisp mark from a tight chalk line will clearly indicate where to fasten your bottom plate to. If you have ever noticed a wavy run of baseboard or crown moulding in a long hallway; or a door that sticks out proud of its jamb or a line of flooring that visibly tapers at the intersection of the wall, these issues can all stem (at least in part, if not in full) from a poor layout. Out of square, out of parallel or not straight or heaven forbid, the trifecta of all three.
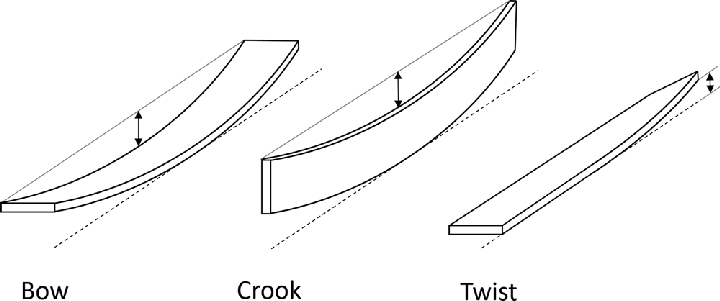
2) Crowning
Working with SPF (Spruce-Pine-Fir) lumber means we are working with a natural product, which will have natural imperfections. How the lumber is milled, how it is dried, how it is stored and even internal tension within the wood itself will cause studs to crown, bow, or twist. As a rule, we try to avoid twisted lumber, it can be culled out and cut into smaller pieces for blocking. Bowed studs can be straightened out with blocking, or even as panels are fastened to their edges it is fairly easy to straighten bows, but stud is rarely bowed enough to cause any issues downstream.
The crown of a stud is likely the culprit behind humps in your wall framing, and the nagging screw pops on your drywall.
The edge of the stud that the drywall on the interior side gets fastened to is where we will find “crown”. Graphic 2.2 below illustrates “bow”, “twist” and “crown”
Another very simple and very beneficial step when building walls is to be diligent in checking every stud for crown, and keeping all crown on the same side of the wall. The walls will not be perfectly flat with SPF framing material, but keeping your crown consistent to one side means the difference from stud to stud will be kept to a minimum, where if crowns were opposing, the problem is exacerbated, and a 3/16” hump may become a 3/8” hump. Cases this severe will complicate and frustrate the process of fastening drywall, installing tile, cabinetry or other millwork.
A good contractor will go a step beyond simply arranging the crowns in the same direction, but will also consider which side of the wall will be convex or concave.
If I have a partition which is a bathroom on one side and the inside of a closet on the other, I will “crown” my studs toward the closet, since it is not a public space, it is almost exclusively hidden from view and will not be receiving any high level of wall treatment, whereas the bathroom side of the wall may likely have tile, a vanity, mirror or a glass partition. All of which would be more difficult to detail over a crowned surface.
2.2
3) Drywall Backing
As the walls are built and stood in place there is often a need for extra blocking for the drywall installer. Sometimes a wall runs parallel to the ceiling joists above and there is nowhere for the ceiling drywall to be fastened to and supported near the ceiling/wall intersection. These are good places to use up leftover cut offs, or culled out material. Photo 2.3 below shows the inside of a bathroom wall. You can see there is blocking that is serving two purposes: it provides a means to secure the adjacent wall, and also provides adequate drywall backing at the intersection of the two walls. Within view is also a 2x6 stud installed “flat” and “flush” with the wall to serve as backup for future shower glass.

2.3
The next blog in this series we will cover wall bracing, straightening and stiffening. Some of the more common methods, useful tools, tricks and techniques.
Thanks once again for reading, if you are looking for a framing contractor, builder or general contractor in the Halton Region please follow the instructions on our contact page for the best ways to reach us.